오늘은 bootstrap을 사용해보겠습니다.
bootstrap 은 미리 만들어진 CSS와 javascript를 지원합니다.
bootstrap에는 아래와 같은 웹사이트를 만들때 필요한 다양한 요소들이 미리 구현되어있습니다.

이제 사용법을 알아봅시다!
https://getbootstrap.com/docs/4.4/getting-started/download/
Download
Download Bootstrap to get the compiled CSS and JavaScript, source code, or include it with your favorite package managers like npm, RubyGems, and more.
getbootstrap.com
위 링크로 들어가 다운로드를 눌러줍니다.
압축을 풀고 복사 붙여넣기를 해줍니다.
<link rel="stylesheet" href="css/bootstrap.css"/>
<script src="js/bootstrap.bundle.min.js"></script>
부트스트랩을 적용하고 싶은 html에 위 코드를 적어줍니다.
<!DOCTYPE html>
<html>
<head>
<meta charset="UTF-8">
<title>index.html</title>
<!-- CSS only -->
<link rel="stylesheet" href="css/bootstrap.css"/>
<script src="js/bootstrap.bundle.min.js"></script>
</head>
<body>
<div class="container">
   <h1>인덱스 페이지 입니다.</h1>
   <div class="alert alert-primary mt-5 ps-5" role="alert">
        A simple primary alert—check it out!
   </div>
   <div class="alert alert-warning alert-dismissible fade show" role="alert">
     <strong>저장 실패!</strong> 다시 시도 하려면 X 를 누르세요
     <button type="button" class="btn-close" data-bs-dismiss="alert" aria-label="Close"></button>
   </div>

   <h2>회원 목록 입니다.</h2>
   <table class="table table-hover">
      <thead>
         <tr>
            <th>번호</th>
            <th>이름</th>
            <th>주소</th>
         </tr>
      </thead>
      <tbody>
         <tr>
            <td>1</td>
            <td>김구라</td>
            <td>노량진</td>
         </tr>
         <tr>
            <td>2</td>
            <td>해골</td>
            <td>행신동</td>
         </tr>
      </tbody>
   </table>
   <!-- 하나의 행을 2개의 칼럼으로 만들고 각각의 칼럼에 table 넣어보기 -->
   <div class="row">
      <div class="col-8">
         <h2>회원 목록 입니다.</h2>
         <table class="table table-hover">
            <thead>
               <tr>
                  <th>번호</th>
                  <th>이름</th>
                  <th>주소</th>
               </tr>
            </thead>
            <tbody>
               <tr>
                  <td>1</td>
                  <td>김구라</td>
                  <td>노량진</td>
               </tr>
               <tr>
                  <td>2</td>
                  <td>해골</td>
                  <td>행신동</td>
               </tr>
            </tbody>
         </table>
      </div>
      <div class="col">
         <h2>회원 목록 입니다.</h2>
         <table class="table table-hover">
            <thead>
               <tr>
                  <th>번호</th>
                  <th>이름</th>
                  <th>주소</th>
               </tr>
            </thead>
            <tbody>
               <tr>
                  <td>1</td>
                  <td>김구라</td>
                  <td>노량진</td>
               </tr>
               <tr>
                  <td>2</td>
                  <td>해골</td>
                  <td>행신동</td>
               </tr>
            </tbody>
         </table>
      </div>
   </div>
</div>
</body>
</html>
https://getbootstrap.com/docs/5.1/getting-started/introduction/
Introduction
Get started with Bootstrap, the world’s most popular framework for building responsive, mobile-first sites, with jsDelivr and a template starter page.
getbootstrap.com
위 링크로 들어가줍니다.

필요한 것들을 헤더에 복붙해줍니다. 저는 CSS와 JS을 복붙해주었습니다.
동작까지 사용하기 위해서는 JS를 사용해주는 것이 좋습니다.
<head>
<meta charset="UTF-8">
<title>Insert title here</title>
<!-- bootstrap css 로딩 -->
<link href="https://cdn.jsdelivr.net/npm/bootstrap@5.1.3/dist/css/bootstrap.min.css" rel="stylesheet" integrity="sha384-1BmE4kWBq78iYhFldvKuhfTAU6auU8tT94WrHftjDbrCEXSU1oBoqyl2QvZ6jIW3" crossorigin="anonymous">
<!-- bootstrap javascript 로딩 -->
<script src="https://cdn.jsdelivr.net/npm/bootstrap@5.1.3/dist/js/bootstrap.bundle.min.js" integrity="sha384-ka7Sk0Gln4gmtz2MlQnikT1wXgYsOg+OMhuP+IlRH9sENBO0LRn5q+8nbTov4+1p" crossorigin="anonymous"></script>
</head>
<!DOCTYPE html>
<html>
<head>
<meta charset="UTF-8">
<title>Insert title here</title>
<!-- bootstrap css 로딩 -->
<link href="https://cdn.jsdelivr.net/npm/bootstrap@5.1.3/dist/css/bootstrap.min.css" rel="stylesheet" integrity="sha384-1BmE4kWBq78iYhFldvKuhfTAU6auU8tT94WrHftjDbrCEXSU1oBoqyl2QvZ6jIW3" crossorigin="anonymous">
<!-- bootstrap javascript 로딩 -->
<script src="https://cdn.jsdelivr.net/npm/bootstrap@5.1.3/dist/js/bootstrap.bundle.min.js" integrity="sha384-ka7Sk0Gln4gmtz2MlQnikT1wXgYsOg+OMhuP+IlRH9sENBO0LRn5q+8nbTov4+1p" crossorigin="anonymous"></script>
</head>
<body>
<h1>인덱스 페이지 입니다.</h1>
<button class="btn btn-primary">버튼</button>
<button class="btn btn-secondary">버튼</button>
<button class="btn btn-success">버튼</button>
<button class="btn btn-info">버튼</button>
<button class="btn btn-warning">버튼</button>
<button class="btn btn-danger">버튼</button>
<button class="btn btn-dark">버튼</button>
<button class="btn btn-light">버튼</button>
<br />
<button class="btn btn-outline-primary">버튼</button>
<button class="btn btn-outline-secondary">버튼</button>
<button class="btn btn-outline-success">버튼</button>
<button class="btn btn-outline-info">버튼</button>
<button class="btn btn-outline-warning">버튼</button>
<button class="btn btn-outline-danger">버튼</button>
<button class="btn btn-outline-dark">버튼</button>
<button class="btn btn-outline-light">버튼</button>
</body>
</html>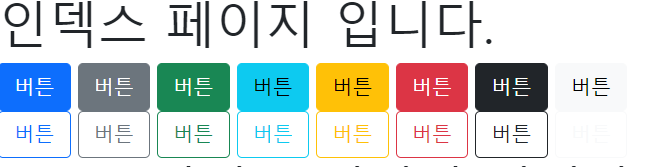
미리 만들어진 CSS를 적용할 수 있습니다.
https://getbootstrap.com/docs/5.1/components/accordion/
Accordion
Build vertically collapsing accordions in combination with our Collapse JavaScript plugin.
getbootstrap.com
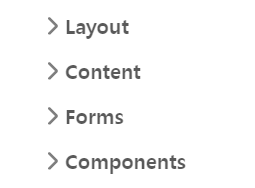
링크에 다시 들어가보시면 왼쪽에 이러한 메뉴를 볼 수 있습니다.
메뉴에 들어가서 자신이 원하는 것을 찾아서 코드를 복사해주면 됩니다.
'WEB' 카테고리의 다른 글
| [WEB] Servlet을 사용하여 동적 웹 사이트 만들어보기 (0) | 2021.11.26 |
|---|---|
| [WEB] Servlet VS JSP (0) | 2021.11.26 |
| [WEB] eclipse 자동완성기능 emmet 설치하기 (0) | 2021.11.17 |
| [WEB] 아파치 톰캣 ,이클립스 설치하기 / 한글 인코딩 설정 (0) | 2021.11.17 |
| [JavaScript] audio를 사용하는 방법들 / currentTime / play (0) | 2021.10.27 |


